
The Honeywell 6160 keypad is an essential component for home security systems, offering a backlit keypad for easy navigation. Designed for user-friendly operation, it ensures reliable control over your security setup. Compatible with Honeywell’s Vista series, this keypad provides advanced features and customizable options. This manual serves as your guide to maximize its potential;
1.1 Overview of the Honeywell 6160 Keypad
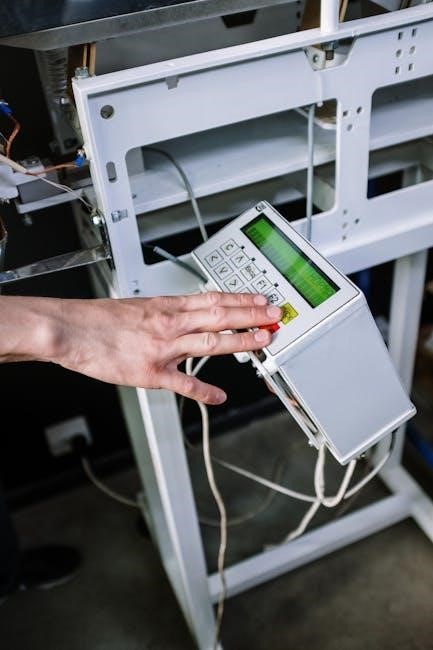
The Honeywell 6160 keypad is a high-quality, backlit security keypad designed for use with Honeywell’s Vista series security systems. It features a sleek, durable design with a 16-character LCD display, providing clear status updates and menu-driven prompts. The keypad offers advanced functionality, including arming/disarming, zone control, and programming capabilities; Its intuitive interface makes it user-friendly, while its robust construction ensures long-lasting performance. This keypad is ideal for both residential and small commercial security setups, delivering reliable control and monitoring of your security system.
1.2 Importance of the User Manual
The Honeywell 6160 keypad user manual is essential for understanding and utilizing the device’s full potential. It serves as a comprehensive guide, detailing installation, operation, and troubleshooting procedures. By following the manual, users can navigate the keypad’s features, customize settings, and resolve common issues efficiently. This resource ensures that both novice and experienced users can optimize the keypad’s performance, making it indispensable for maximizing security and functionality. Regular reference to the manual guarantees a seamless and secure experience with the Honeywell 6160 keypad.
1.3 Target Audience for the Manual
This manual is designed for homeowners, security professionals, and technicians who install, maintain, or use the Honeywell 6160 keypad. It is particularly useful for individuals seeking to understand the keypad’s features, configure settings, or troubleshoot issues. The guide is also beneficial for new users who need a step-by-step introduction to operating the device. Whether you’re a novice or an experienced user, this manual provides the necessary information to ensure optimal use and functionality of the Honeywell 6160 keypad.

Getting Started with the Honeywell 6160 Keypad
This section introduces the Honeywell 6160 keypad, helping users understand its ease of use, essential features, and how to navigate its system for basic functionality and setup.
2.1 Unboxing and Physical Description
Upon unboxing the Honeywell 6160 keypad, you’ll find the device, mounting hardware, and user manual. The keypad features a sleek, compact design with a backlit LCD display and rubberized buttons. It includes a 12VDC transformer and wiring connectors for installation. The physical design ensures durability, with a lightweight yet robust construction suitable for wall mounting. The keypad’s dimensions and layout are ergonomically designed for easy access and visibility, ensuring intuitive operation for all users.
2.2 Basic Components and Layout
The Honeywell 6160 keypad features a backlit LCD display for clear visibility in low-light conditions. It includes a numeric keypad, function keys, and emergency panic buttons. The layout is organized with clearly labeled buttons for ease of use. LED indicators provide visual feedback for system status, such as arming, disarming, and alarm conditions. The keypad also includes wiring connectors for secure installation and communication with the security system. Its intuitive design ensures quick access to essential functions, making it user-friendly for both new and experienced users.
2.3 Initial Setup and Powering On
Connect the Honeywell 6160 keypad to your security system and mount it as described. Power on the keypad by connecting it to the system’s power source. Allow the system to complete its power-up sequence, which may take a few seconds. The LCD display will illuminate, showing the system status. Ensure all connections are secure and test the keypad by entering your user code. If the keypad does not power on, check all wiring connections and consult the troubleshooting section for further assistance.
Installation and Mounting
This section guides you through the proper installation and mounting of the Honeywell 6160 keypad, ensuring optimal location, secure mounting, and correct connection for reliable functionality.
3.1 Choosing the Right Location
Selecting the ideal location for your Honeywell 6160 keypad is crucial for convenience and security. Place it in a central, easily accessible area, such as near an entry point, to ensure quick arming and disarming. Avoid locations prone to direct sunlight, as it may cause glare on the LCD display. Additionally, choose a spot away from extreme temperatures or moisture to prevent damage. Ensure proximity to a power source if not using battery power. Opt for a location that balances accessibility with security, avoiding areas easily accessible to potential intruders.
3.2 Mounting the Keypad on the Wall
Mounting the Honeywell 6160 keypad on the wall ensures convenient access and a neat installation. Begin by selecting a stable location, preferably at a comfortable viewing height. Use the provided wall mounting plate and screws to secure the keypad. Ensure the surface is level and drill pilot holes if necessary. Align the keypad with the mounting plate and fasten it securely. Avoid overtightening to prevent damage. Once mounted, test the keypad to ensure proper functionality and adjust if needed for optimal viewing angles. Proper installation ensures durability and ease of use.
3.3 Connecting the Keypad to the Security System
To connect the Honeywell 6160 keypad, locate the terminal block on the rear. Ensure the system is powered down to avoid damage or electrical shock. Use the provided wiring diagram to identify the correct terminals for power, data, and zone connections. Securely attach the wires, ensuring proper tightness. Use 4-conductor wire for power and data connections. Once connected, power on the system and test the keypad to confirm functionality. Refer to the wiring diagram for specific terminal assignments and connection requirements. Proper installation ensures reliable communication between the keypad and security system.
Operating the Honeywell 6160 Keypad
The Honeywell 6160 keypad offers intuitive operation with a backlit display for easy navigation. Users can arm/disarm the system, access programming, and view real-time status updates effortlessly.
4.1 Navigating the Menu System
Navigating the Honeywell 6160 keypad’s menu system is straightforward. Press the ‘*’ key to access the menu, then use the arrow keys to scroll through options. Select an option by pressing ‘OK’ or ‘Enter.’ The ‘0’ key allows you to return to the previous screen. The backlit display clearly shows menu items and system status, ensuring easy navigation. This intuitive design helps users quickly access settings, zones, and system functions, making it easy to manage your security setup efficiently.
4.2 Entering and Exiting Programming Mode
To enter programming mode on the Honeywell 6160 keypad, press the ” key followed by your installer code (default is 9999). The keypad will confirm entry with a beep. Once in programming mode, use the arrow keys to navigate and the ‘OK’ key to select options. To exit, press the ” key again or the ‘Cancel’ key. The system will prompt for confirmation before exiting. Always ensure you save changes before exiting to avoid losing configurations. This feature ensures secure and controlled system adjustments.
4.3 Arming and Disarming the System
To arm the system, enter your valid user code and press the ‘Arm’ key. The keypad will beep and show confirmation on the display. For disarming, press your user code followed by the ‘Disarm’ key. The system will confirm disarming with a tone and display update. Always ensure the keypad shows ‘Ready to Arm’ before arming. Note that arming may trigger an exit delay, allowing you to leave the premises. The master code can disarm the system, even if armed with a user code. The keypad’s LCD will indicate the current armed state with a red light. Proper arming ensures maximum security.

Programming the Honeywell 6160 Keypad
Programming the Honeywell 6160 keypad allows you to configure system settings, user codes, and zone configurations. Use the master code to access programming mode and customize your security setup. This step ensures your system operates according to your preferences and security needs, providing a personalized experience. Proper programming is essential for optimal functionality and system performance. Always follow the manual guidelines to avoid errors during the process.
5.1 Understanding Programming Modes
The Honeywell 6160 keypad offers multiple programming modes, including Installer, Master, and User modes. Installer mode provides advanced system configuration, while Master mode allows management of user codes and access levels. User mode is limited to basic system interactions. Understanding these modes ensures proper customization and security. Always use the master code to access programming modes. Follow the manual guidelines to avoid unauthorized access or system errors. Proper mode selection is crucial for maintaining system integrity and functionality.
5.2 Configuring User Codes and Access Levels
The Honeywell 6160 keypad supports up to 242 user codes, each with customizable access levels. Codes can be assigned to specific users, with options like Master, User, or Special codes. Master codes grant full system control, while User codes provide limited access. Special codes can be programmed for temporary or restricted use. Use the Master Code to configure user codes and access levels. Ensure codes are unique and stored securely. Testing each code after programming ensures proper functionality and access control. This feature enhances security and flexibility for system management.
5.3 Setting Up Zones and Sensors
Zones on the Honeywell 6160 keypad represent different areas or devices in your security system. Each zone can be configured for specific sensors, such as door contacts or motion detectors. Use the Master Code to program zone types, like perimeter or interior zones, and assign sensors accordingly. Configure zone responses, such as triggering alarms or sending notifications. Ensure all sensors are properly connected and tested after setup. Labeling zones clearly enhances system monitoring and response efficiency. Proper zone configuration ensures comprehensive security coverage and accurate system alerts. Regularly review and update zone settings as needed.

Advanced Features of the Honeywell 6160 Keypad
The Honeywell 6160 keypad offers advanced features like customizable alerts, integration with smart devices, and enhanced control over your security system. Its backlit display ensures ease of use, while robust performance delivers reliable security monitoring and management. These features combine to provide a seamless and intuitive experience, ensuring your home or business remains protected with cutting-edge technology.
6.1 Using the Keypad’s LCD Display
The Honeywell 6160 keypad features a backlit LCD display designed for clear visibility in various lighting conditions. This display provides real-time system status updates, including armed/disarmed states, zone violations, and event logs. Users can navigate through menus using arrow keys to access detailed information. The LCD screen also shows error messages and troubleshooting prompts, ensuring easy identification of system issues. Adjusting the display brightness is simple, and the backlight timer can be set for energy efficiency; These features make the keypad user-friendly and enhance overall security monitoring capabilities.
6.2 Customizing Alerts and Notifications
The Honeywell 6160 keypad allows users to customize alerts and notifications for enhanced security and convenience. You can program the keypad to display specific messages for system events, such as arming reminders, zone violations, or low battery warnings. Chime settings can be adjusted to alert you of door or window openings. Additionally, users can enable voice announcements for system status updates. These customization options ensure you stay informed about your security system’s activity, providing peace of mind and quick response capabilities during potential threats.
6.3 Integrating with Other Security Devices
The Honeywell 6160 keypad seamlessly integrates with other security devices, enhancing your home or business protection. It works with Honeywell’s Vista series panels, wireless receivers, and motion detectors. Users can connect smoke detectors, carbon monoxide sensors, and cameras for a comprehensive security network. Additionally, integration with home automation systems allows control of lighting and thermostats directly from the keypad. This versatility ensures a unified and responsive security system, providing enhanced monitoring and control capabilities for your property.
Maintenance and Troubleshooting
Regular maintenance ensures optimal performance. Clean the keypad with a soft cloth and avoid harsh chemicals. Troubleshoot issues by checking connections and power sources. Resetting the keypad may resolve software glitches without affecting programmed settings.
7.1 Cleaning and Maintaining the Keypad
Regular cleaning ensures the Honeywell 6160 keypad functions optimally. Use a soft, dry cloth to wipe the surface and remove dust or fingerprints. For stubborn stains, lightly dampen the cloth with water, but avoid excessive moisture. Never use harsh chemicals or abrasive materials, as they may damage the keypad or LCD display. Inspect the keypad periodically for debris or dirt accumulation. For the LCD, use a screen cleaner and a soft cloth to prevent scratches. Proper maintenance extends the lifespan and reliability of your Honeywell 6160 keypad.
7.2 Common Issues and Solutions
Troubleshooting the Honeywell 6160 keypad involves addressing issues like non-responsive keys or a blank LCD display. If the keypad doesn’t power on, check the power supply and wiring connections. For unresponsive keys, clean the keypad surface thoroughly. A blank display may indicate a loose connection or faulty backlight; restart the system or replace the keypad if necessary. Connectivity issues with the security system can often be resolved by rebooting the panel or verifying wiring integrity. Refer to the manual for detailed diagnostic steps to resolve these common problems effectively.
7.3 Resetting the Keypad to Factory Settings
Resetting the Honeywell 6160 keypad to factory settings restores it to its default configuration, erasing all custom settings. To reset, press and hold the 1 and 3 keys while powering on the keypad. Release the keys when the LCD displays “System Reset.” This process clears user codes, zone configurations, and other customizations. After resetting, the keypad will need to be reprogrammed and reconnected to your security system. Always back up your settings before performing a factory reset. Consult the manual for detailed instructions.
Security Best Practices
Ensure strong user codes, update software regularly, and monitor system activity to maintain optimal security. Always verify access levels and keep the keypad in a secure location.
8.1 Protecting User Codes and Access
To ensure maximum security, always use strong, unique user codes and limit access to authorized individuals. Avoid using default codes and change them periodically. Never share codes publicly or with unauthorized users. Use the keypad’s access level features to restrict functionality based on user roles. Regularly review and update user permissions to reflect changes in household or staff. Keep the keypad out of reach of children and visitors to prevent accidental or intentional tampering.
8.2 Regularly Updating System Software
Regular software updates are crucial for maintaining optimal performance and security of your Honeywell 6160 keypad. Updates often include bug fixes, enhanced features, and improved compatibility. To update, connect the keypad to your system and follow the manufacturer’s instructions. Always download updates from trusted sources to avoid malware. After updating, test the keypad to ensure all functions work correctly. Keeping your system up-to-date protects against vulnerabilities and ensures you have the latest security enhancements.
8.3 Monitoring System Activity
Monitoring system activity ensures your security setup remains efficient and secure. Use the Honeywell 6160 keypad to review event logs and receive real-time alerts for arming/disarming, zone breaches, or system errors. Regularly checking these logs helps identify unusual patterns or unauthorized access; Adjust alert settings to prioritize notifications for critical events. By staying informed, you can address potential issues promptly and maintain a robust security environment. This proactive approach enhances overall system reliability and user peace of mind.
Compatibility and Integration
The Honeywell 6160 keypad is designed to seamlessly integrate with Honeywell’s Vista series security systems and compatible home automation platforms. It supports voice control through smart home systems, ensuring enhanced security and convenience. This versatility allows users to create a unified security ecosystem, optimizing functionality and streamlining system management for a comprehensive home security solution.
9.1 Compatible Security Systems
The Honeywell 6160 keypad is fully compatible with Honeywell’s Vista series security panels, including the Vista-20P and Vista-15P. It works seamlessly with these systems, ensuring reliable performance and integration. Additionally, the keypad supports compatibility with other security systems that utilize its communication protocols. This versatility allows users to integrate the keypad into their existing security infrastructure, enhancing functionality and control. For optimal performance, ensure the system is compatible with the keypad’s firmware and communication standards before installation.
9.2 Integrating with Home Automation Systems
The Honeywell 6160 keypad can seamlessly integrate with home automation systems, enhancing your smart home experience. Compatible with Honeywell Home and Total Connect systems, it allows for remote monitoring and control. Users can manage security, lighting, and thermostats through a single interface. The keypad supports voice command integration with Amazon Alexa and Google Home, enabling hands-free control. This integration simplifies daily routines and improves convenience, ensuring a unified smart home ecosystem. Regular software updates ensure compatibility with evolving automation technologies.
9.3 Using the Keypad with Other Honeywell Products
The Honeywell 6160 keypad is designed to work seamlessly with other Honeywell products, enhancing your security setup. Compatible with Honeywell’s Vista series panels, it offers integrated control over security, automation, and monitoring. Using the keypad with Honeywell’s Total Connect platform allows for remote access and management of your system. This integration ensures a unified and efficient security solution, providing real-time notifications and easy adjustments. Compatibility with Honeywell products maximizes functionality, ensuring a smooth and secure experience for users.

Safety Precautions
Always handle electrical components with care to avoid damage. Keep the keypad away from liquids and extreme temperatures. Ensure proper installation to maintain functionality and safety standards.
10.1 Handling Electrical Components
When handling electrical components of the Honeywell 6160 keypad, ensure you avoid direct contact with metal parts to prevent static discharge. Wear an anti-static wrist strap or ground yourself by touching a metal object. Power down the system before performing any maintenance or repairs. Use insulated tools to minimize the risk of electrical shock. Never expose components to liquids or moisture, as this can cause irreversible damage. Properly ground the system during installation to ensure safety and optimal performance.
10.2 Avoiding Damage to the Keypad
To prevent damage to the Honeywell 6160 keypad, clean it regularly with a soft, dry cloth. Avoid using harsh chemicals or abrasive materials that could scratch the LCD display. Keep the keypad away from direct sunlight and extreme temperatures. Ensure it is mounted securely to prevent physical stress or impact. Regularly inspect wires and connections for signs of wear. Avoid exposing the keypad to moisture, as this can damage internal components. Always follow proper installation and maintenance procedures to ensure optimal performance and longevity.
10.3 Ensuring Proper Installation
Proper installation of the Honeywell 6160 keypad is crucial for optimal performance. Follow the user manual guidelines to select a suitable location, ensuring the keypad is accessible yet secure. Mount the keypad firmly on a flat surface using the provided hardware. Connect all wires carefully, avoiding loose connections. After installation, test all functions to confirm they work correctly. Regularly inspect the keypad and its connections to prevent issues. Refer to the manual for troubleshooting steps if any problems arise during or after installation.

Frequently Asked Questions (FAQs)
Find answers to common questions about the Honeywell 6160 keypad. Address issues like power problems, code resets, and display malfunctions. Get troubleshooting tips and solutions here.
11.1 What if the Keypad Doesn’t Power On?
If the Honeywell 6160 keypad fails to power on, first check the power source. Ensure the battery is fully charged or replace it if necessary. Verify all connections to the security system are secure. If using an AC adapter, confirm it is properly plugged in. Check for blown fuses or tripped circuit breakers in your home’s electrical panel. If the issue persists, press and hold the * and # keys simultaneously for 5 seconds to reset the keypad. If it still doesn’t power on, contact a certified technician for assistance.
11.2 Can I Change the Display Settings?
The Honeywell 6160 keypad allows you to adjust display settings for optimal visibility. To modify the brightness or contrast, navigate to the system menu by entering your user code and selecting the appropriate option. Use the arrow keys to adjust the settings to your preference. Note that some display features may be locked by the system administrator and require advanced access. If adjustments are not saving, ensure the system is disarmed and retry. Refer to the manual for detailed steps or contact a technician for further assistance.
11.3 How Do I Reset My User Code?
To reset your user code on the Honeywell 6160 keypad, first ensure the system is disarmed. Enter the master code to access programming mode. Navigate to the “User Codes” section and select the user code you wish to reset. Delete the existing code and assign a new one. Save your changes and exit programming mode. Remember to keep your codes secure and share them only with trusted individuals. If you do not have access to the master code, contact your system administrator or a professional technician for assistance.
Mastery of the Honeywell 6160 keypad enhances your security experience. Refer to this manual periodically for optimal performance and updates on features.
12.1 Summary of Key Features
The Honeywell 6160 keypad offers a backlit LCD display for clear visibility, enabling easy navigation through its menu-driven interface. It supports up to 32 user codes, providing secure access control. The keypad is compatible with Honeywell’s Vista series, ensuring seamless integration with existing security systems. Features include arming/disarming functionality, zone management, and programmable alerts. Its robust design and user-friendly layout make it ideal for both residential and small commercial settings. Regular updates and maintenance ensure optimal performance, making it a reliable choice for security needs.
12.2 Final Tips for Effective Use
To maximize the Honeywell 6160 keypad’s performance, regularly update its software and maintain a clean interface. Always keep user codes confidential and ensure only authorized individuals have access. Familiarize yourself with the menu system to navigate settings efficiently. Test arming and disarming functions periodically to confirm proper operation. For optimal integration, pair the keypad with compatible Honeywell devices. By following these guidelines and referring to this manual, you can ensure a secure and user-friendly experience with your Honeywell 6160 keypad.
Be First to Comment